When it comes to building and managing a WordPress site, adding images and other forms of media is a crucial aspect. However, it can become quite challenging when you have to upload a large number of files using the default upload tool in the Media Library. Uploading files one by one can be time-consuming and frustrating, especially if you are working on a project with many files to upload. Fortunately, there is a solution! You can use an FTP client to bulk-upload files to WordPress. Not only does this save you time, but it also bypasses the Media Library’s upload size limitations. In this post, we’ll explore the benefits of bulk uploading and guide you through the process of using FTP for file transfers.
Why you might want to upload images and files in bulk
The WordPress Media Library provides an easy way to manage and upload your files. You can add multiple or single files by browsing to Media → Add New from your admin area.

You can use it to upload images, audio, and video files. Unfortunately, WordPress has a maximum file upload size limit. This ranges from 2MB to 300MB, depending on the settings of your server. Therefore, this feature is not ideal for uploading large files like videos or adding several files at once.
If you need to do either of these things, we recommend either using a video plugin to upload and host your videos, or uploading your files to WordPress via FTP. The FTP method can be a lot more flexible (and less frustrating) than trying to navigate the default Media Library upload feature.
Whenever you upload files via FTP, they automatically go live on your server. However, if you want them to be visible and accessible in your Media Library, you’ll have to take additional steps to register them. We’ll walk you through the entire process in the next section.
How to bulk upload files to WordPress via FTP
If you’re looking for an alternative way to bulk upload files to WordPress, the best option is to use an FTP client. Below we’ll walk you through the process in three simple steps.
Step 1: Connect to your WordPress site via FTP
To get started, you’ll need to connect to your website via an FTP client like FileZilla.

To connect to the server, you’ll need your FTP credentials. You can obtain this information from your hosting provider.
You’ll need your hostname, username, password, and port. After you enter that information, you can select Quickconnect.
Step 2: Upload your files to your wp‑content/uploads folder
After you connect to your site, you’ll see a list of your website files. The next step is to upload your media to the uploads folder. You can find this by navigating to public_html → wp-content → uploads.

You can add your files to a new folder or use the dates folder created by WordPress. To upload the files, you can simply drag them from the Local site tab to the Remote site tab.
You can add as many files as you wish. Depending on the size of your upload, the process may take some time to complete.
Step 3: Register your uploaded files to your WordPress media library
If you navigate to your media library, you’ll notice that you can’t see the files that you’ve just uploaded via FTP. This is because you haven’t registered them yet. To do this, use the Add From Server plugin.
Note that this tool hasn’t been updated recently. If you prefer, you can also register your files via WP-CLI. We’ll show you how to do this in the next section. For now, let’s see how to use the Add From Server plugin.
Once you’ve installed and activated the plugin on your site, navigate to Media → Add From Server to access its interface.

Next, select the uploads folder and locate the one you’ve just uploaded your files to.
Within the folder, you’ll see a list of your uploaded files. You have the option to select all files or individual ones. When you’re ready, click on the Import button.

You may need to wait a few minutes for the upload to complete, depending on the number of files. When it’s ready, you’ll see a success message. Now you can access those files in your media library.
Alternative methods for bulk uploading files to WordPress
If you don’t want to use the Add From Server plugin to bulk upload files to WordPress, there are some alternative methods you can use. This includes a couple of plugins, as well as WP-CLI and cPanel. Let’s take a closer look at these options.
Use the Media from FTP plugin
You can also upload your media files using the Media from FTP plugin. This tool provides a bit more functionality than the previous one. It’s free to use and lets you schedule the import process to run automatically. You can use it to register your uploads to the Media Library with ease.
It’s important to note that this plugin will eventually be replaced by its successor, Bulk Media Register. Therefore, we don’t recommend relying on this tool as a permanent solution, but rather as a temporary means to bulk register your files.
Once it’s installed and activated on your website, the plugin will add a new Media from FTP menu item to your WordPress dashboard.

To get started, you can select Search & Register. The default settings will organize your files by month and date.
On the Search & Register screen, you can select single files or an entire folder to upload. In this situation, we want to make sure that wp-content/uploads is selected. Then, click on the Update Media button.

You can also filter the search based on certain types of extensions. For example, you could select jpeg from the drop-down menu to only register your jpeg images.
If you want to change the default settings, you can do so by navigating to Media from FTP → Settings. Here, you can change the folder structure of your uploads and adjust the search method.
Install the Upload Media by Zip plugin
If you don’t want to use FTP to bulk upload files to WordPress, you can use the Upload Media by Zip plugin instead.
Although this free tool isn’t actively maintained, it does let you upload a ZIP folder to WordPress without having to connect via FTP. It won’t help you when it comes to uploading large files, so it’s not the best option if your issue is circumventing the WordPress upload limit.
However, it can help you when you want to upload a lot of small files. Once you’ve uploaded your ZIP file, the tool will open it to extract your images and place them in your Media Library.
Once you’ve installed and activated the plugin, you’ll see a new Upload and Extract a Zip Archive button in your WordPress editor.

In the Classic Editor, you can locate the icon next to the standard Add Media button. After you click on it, you can select the ZIP file from your computer. It will also give you the option to delete the ZIP file after upload.
Once you’ve selected your file, you can click on the Upload and Extract button to start the process.
When it’s done, you’ll see a success message containing all the files that were extracted, as well as the option to add the files to your post.
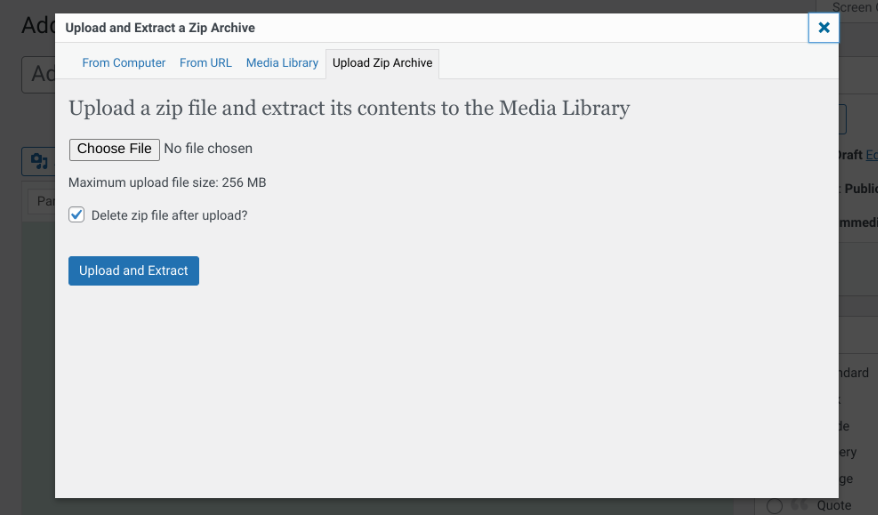
Another option for uploading a ZIP file is to navigate to Media → Upload Zip Archive.

Again, it’s important to note that most of these plugins are not actively maintained. Plus, you won’t get as much flexibility and control as you would if you uploaded your files via FTP. If you want to upload files without a plugin or FTP, you can register them using WP-CLI instead.
Register uploaded files using WP‑CLI
Registering files using WP-CLI is not the most beginner-friendly option. However, if you’re familiar with it and feel comfortable using commands, it can be a quick and efficient solution for registering files to the WordPress Media Library.
This method also lets you attach files to certain posts, and add titles and captions to your images. Also, WP-CLI gives you the option to import individual files, or import files that belong to a certain category.
To register files using WP-CLI, you can use the wp media import command. If you wanted to import specific files, you could use a more defined command. For instance, to import all JPG images from your pictures folder, you could use the following:
wp media import ~/Pictures/**\/*.jpgFor more information about using WP-CLI, we recommend referring to the WordPress Developer Handbook’s import command guide.
Go through the cPanel File Manager
If you want an alternative to FTP, you can upload files using your File Manager in cPanel (if your host uses cPanel). Again, this isn’t the ideal method for bulk uploading files, but it can be a great way to get around WordPress’ upload limit.
Once you log into your cPanel account, navigate to the File Manager option in your dashboard.

Next, select the Upload button to add your files to your wp-content/uploads folder. Unfortunately, you can only upload one file at a time, which can be a little time-consuming. One workaround is to upload a folder of images as a ZIP file. You can then extract the contents of the folder and delete the original ZIP file.
When you’re done, you’ll still need to register your files with your Media Library. As with the FTP method we covered earlier, you can install the Add From Server plugin to import the files to your site.
Use FTP to easily upload files to WordPress in bulk
WordPress is a great content management platform, but the default functionality provided by the Media Library can be limiting, especially when you want to upload many files at once.
Fortunately, you can bulk upload files to WordPress via FTP in three easy steps:
- Connect to your site via an FTP client, like FileZilla.
- Upload your WordPress files.
- Register your uploaded files using a plugin like Add From Server.
Are you looking for other ways to speed up the management of your WordPress site? Check out Jetpack’s WordPress performance tools to see how they can help!